Search engine optimization or SEO in short is one of the most discussed matter for both bloggers and serious content writers. For those who are using WordPress SEO by Yoast, you are really lucky. It is one of the best free SEO plugins for WordPress and it serves millions of blogs daily.
As easy as it sounds, configuring WordPress SEO by Yoast is challenging and there are probably a dozen or more guides on this topic itself.
Yes, this is how important this plugin is to many bloggers.
Personally, I have been using this plugin since 2005 and it had never failed me (badly) before. Don’t be fooled by the years of me using this plugin; I am always finding the best settings for WordPress SEO by Yoast that could bring my website to the next level.
When I redesigned my website recently, I decided that I need to cut down on the number of plugins and I am using more than one SEO plugin. Being a lazy person, I had ‘integrated’ Scribe SEO, SEOPressor and WP Social Booster Pro into my SEO blueprint as well.
Now, that’s 4 different plugins to do one job; SEO. So, I decided that it is time to ‘get up from the couch’ and do my homework. I basically ditched all of those and left with WordPress SEO.

What are the best settings for WordPress SEO by Yoast?
Listen to me.
WordPress SEO by Yoast is so powerful that the wrong settings could easily disrupt your SEO strategies to dominate the SERPs.
I did many research overtime and found out that there are many different settings that could work depending on your blogging style.
Disclaimer: I had personally tested these settings and they work fine for me. Certainly, I hope these work well for you too.
Generally, WordPress SEO plugin allows you to configure many SEO aspects such as NoFollow and NoIndex. There are things that you need to consider if you are going to enable them.
Dashboard
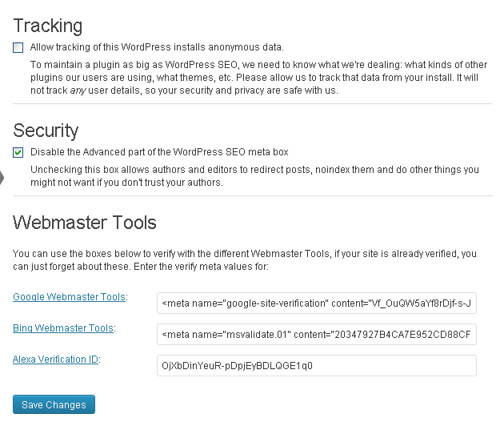
This part is rather easy. You can decide to enable or disable the tracking as it has no effect on SEO. I am being a security freak and I disallow that. Same goes to the Security settings. However, I highly recommend to enable it if you are running a multi-author blog.
As for the Webmaster Tool settings, copy and paste the meta tags given by the respective sites. As easy as 1, 2 and 3 right?
Titles & Metas
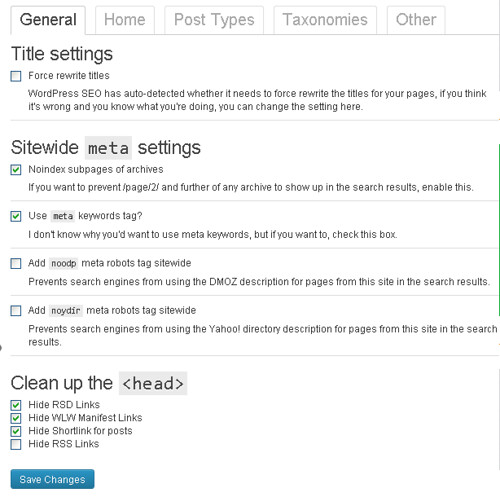
As you can see above, I enabled:
- Noindex subpages of archieves
- Use mate keywords tag
- Hide RSD Links
- Hide WLW Manifest Links
- Hide Shortlink for posts
Some experts advise to enable the ‘Force rewrite titles’ but for me, I rather leave it out.
Enabling meta keywords tag is also your decision. Disable this option and you will not need to enter any keywords in posts and pages anymore.
Google does not use meta keywords anymore for ranking. However, other search engines such as Yahoo and Bing still use them but on a very limited basis. Even Yoast recommend to disable it.
1. Homepage settings
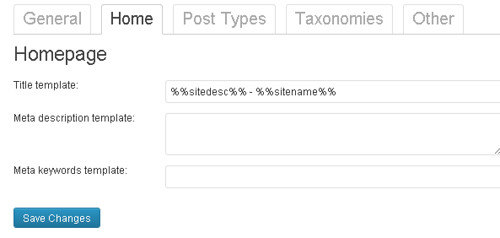
For title template, I am using %%sitedesc%% – %%sitename%% but you are free to use your own methods. Some even ditch the sitename since it is just for branding.
As for meta description, I would recommend between 100 to 120 characters count. Remember that this will only be visible for your homepage. This is where you write a simple description of what your website is all about.
If you had enabled meta keywords tag earlier, you would have the option to key in your meta keywords. You may leave it blank or put in your keywords.
2. Post Types
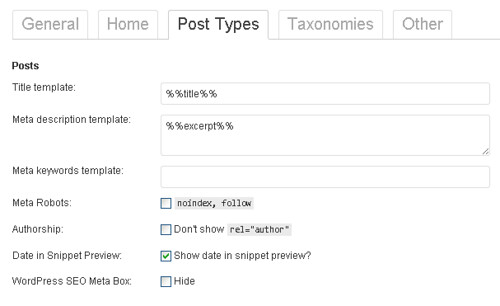
Here, ensure that you DO NOT enable noindex and nofollow on Posts and Pages. The rest, you can leave it as it is or by default.
You may or may not change the template settings here as the default is rather good already.
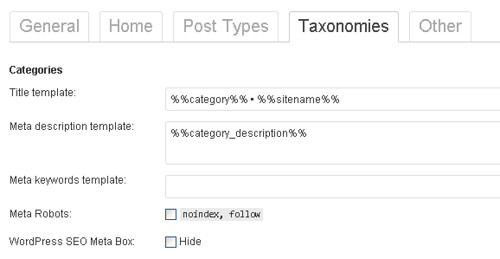
3. Taxonomies
One of the biggest concern here is to either enable both the noindex and nofollow or enable just one of them.
For me, I enable nofollow for my Tags only.
Do not enable dofollow for both Categories and Tags as this will create duplicate content.
*I am not going into detail for Other tab as no changes needed to be done there.
Social settings
Yoast WordPress SEO makes Open Graph and Twitter Cards setting easy and highly configurable. Yes, Yoast SEO really saves up a lot of ‘space’ as it replaces many plugins.
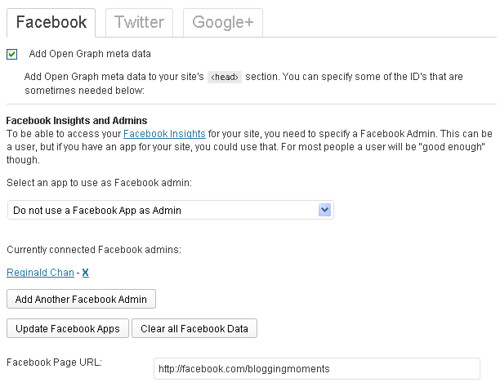
1. Facebook
As seen above, enable the Open Graph setting and add your Facebook account. Generally speaking, using your personal account is already sufficient. However, you may also link your Facebook page as an admin too.
Last but not least, adding your Facebook page URL into the right column.
2. Twitter
You can use WordPress SEO to configure Twitter Cards as well. All you need to do is to enable the option and key in your Twitter handler. Of course, you would need to apply it at the first place.
Read more about it here; What is Twitter Cards all about?
3. Google+
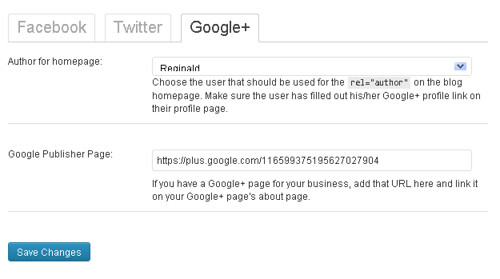
So, how about Google+? WordPress SEO by Yoast makes Google authorship easier. All you need to do are:
- Ensure your WordPress profile is updated with the right Google author link
- Select your Google+ profile via WordPress SEO
- Key in your Google+ publisher link (Google+ page) if you have any
Yup! Your Google+ authorship is all set and running.
Related post: How do you enable Google+ custom URL?
XML Sitemap settings
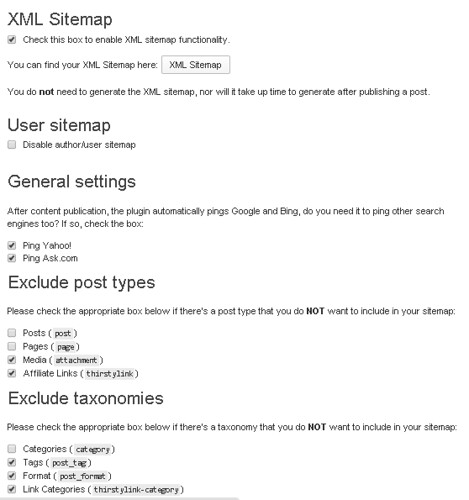
I know some bloggers use this while other doesn’t. If you are using it, you need (or recommended) to enable:
- Enable the XML sitemap feature
- Ping Yahoo!
- Ping Ask.com
- Media
- Affiliate links (some users don’t have it so no worries about it)
- Tags
- Format
- Link categories (some users don’t have it so no worries about it)
You can find your sitemap by clicking ‘XML sitemap’ or search for this on your browser: http://yourdomain.com/sitemap_index.xml
Whenever you update or publish any new posts, Yoast SEO will automatically send the new sitemap to Google Webmaster Tool. All you need to do is to manually submit the sitemap to Bing once a week or so.
Permalinks
For this part, do not configure anything else unless you are absolutely sure of what you are doing. Changing permalinks on a live site could easily make your links go 404-error.
Recommended settings (enable these):
- Redirect attachment URL’s to parent post
- Remove the ?replytocom variables
For the record, both the settings above are recommended and highly optional.
Internal Links
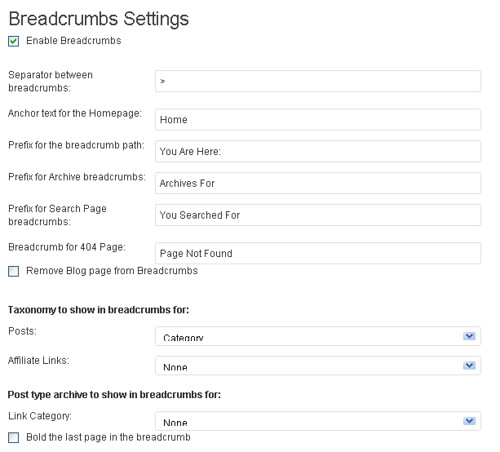
This is the breadcrumbs settings. You can enable or disable it according to your liking. For those using Genesis Framework, breadcrumbs are pre-installed and just like WordPress SEO, you can just tick to enable or disable it from the Genesis settings.
If you have no idea what this is, it is absolutely safe to disable it.
RSS settings
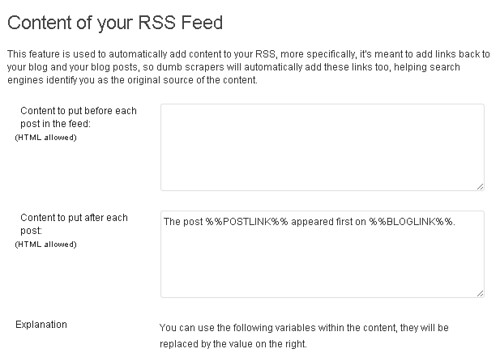
This basically configures your RSS settings. Just like the above, if you have no idea what this is all about, then just leave it alone.
Congratulation! You have successfully configured your WordPress SEO
Phew, that was long right? Basically configuring WordPress SEO is rather easy. Once you had set it up, you can basically leave it alone for a long, long time.
Remember that WordPress SEO or any SEO plugins doesn’t help you directly in terms of improving your ranks. These SEO tools usually helps to provide crucial suggestions to further optimize your blog post.
Now, over to you. Do you have any special WordPress SEO settings you would like to share? Tell me more using the comment form below!
