Recently, Google decided to drop the bomb and ended the famous (and trusted), Google Keyword Tool from service. It was replaced by the new version which is called Google Keyword Planner.
I would be lying to you if I say that I love Google Keyword Planner at first. In fact, I hated so much due to so many obvious reasons. When I heard that Google Keyword Tool is going ‘off’, I told myself to stick to a few SEO tools such as Scribe, Long Tail Pro and SEMRush.
Early this month, I decided to try on it and promised to sit in front of my old HP Pavilion laptop trying to learn everything about it.
Without much delay, this blog post is all about Keyword Planner and how you can really use it for your advantage when it comes to keyword research. I am not going to deny that for starters, it has slight learning curve compared to the previous version.

What is Google Keyword Planner?
It is the new replacement of Google Keyword Tool (duh!) and it is said to provide great experience for bloggers who are trying to find quality keywords.
Now, how true is this?
Google Keyword Planner is a double edge blade. It works pretty well if you know what you are looking for. If you are hoping that this keyword planner will give you some good keywords with just some clicks, then you better stick to premium SEO tools like this one.
Here are a few things I like about the almighty Google Keyword Planner:
- Chances of finding long tail keywords
- Easier keyword finding once you get used to it
- Multiple ways to search for a specific keyword or niche
- Merging Google AdWords with Keyword Planner is great for paid advertisements
Google Keyword Planner – The basic
There are four very easy but different ways you can find perform keyword research on Keyword Planner which are:
- Searching for keywords and ad groups ideas
- Enter or upload keywords to see how they perform
- Get traffic estimates for a list of keywords
- Multiply keyword lists
This is probably the place where most bloggers and keyword searchers give up!
Everything looks so complicated here and for newbie, this can be a very huge disappointment considering that Keyword Planner is said to be better than the previous keyword tool right?
Yup, that happened to me too and continue reading the below for more information.
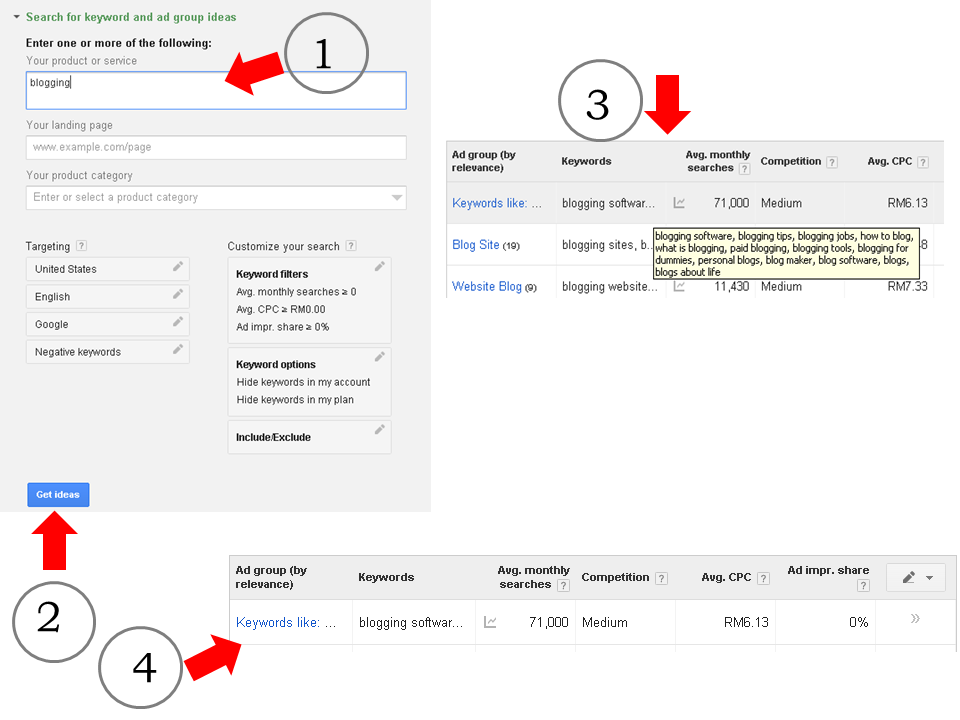
1. Searching for keywords and ad groups ideas
Advantages: Finding long tail keywords and possible keywords to use (using ad groups)
Disadvantages: Figures are not specific and there is a possibility of having a low searched keyword in the ad groups
This is the part where you can find groups of keywords which could be very useful for you in blogging and each groups of keywords would have roughly between 5 to 12 different long tail keywords.
For example, you are searching for the keyword ‘blogging’ and Keyword Planner gives you probably a dozen or more keyword groups.
Now, let’s take the first keyword group with an average of 71,000 average monthly searches. The group is consisted of several keywords such as:
- Blogging software
- Blogging tips
- Blogging jobs
- How to blog
- What is blogging
- Paid blogging
- Blogging tools
- Blogging for dummies
- Personal blogs
- Blog maker
- Blog software
- Blogs
- Blogs about life
This means that, these are some keywords which are highly related to the term you are searching, ‘blogging’ and has a total of about 71,000 searches monthly.
Now, read the above sentence again and tell me what you had actually read.
The total number of searches on this ad group is 71,000 and it is a combination of all the above keywords. This means that there is a high chance that some keywords are actually searched more than the other.
Does this make any sense to you?
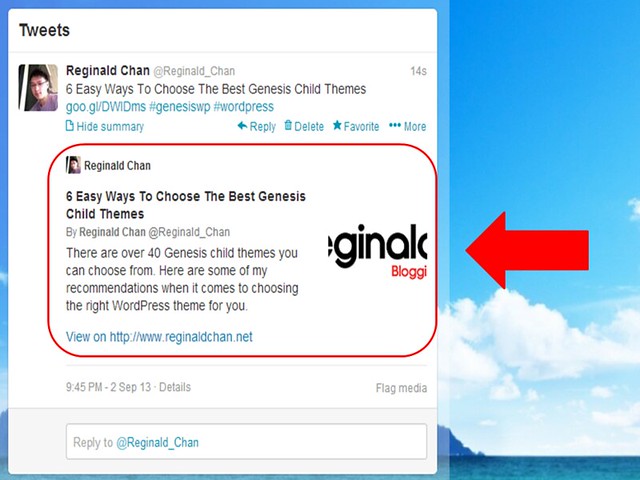
Here’s what it looks like for a clearer picture:
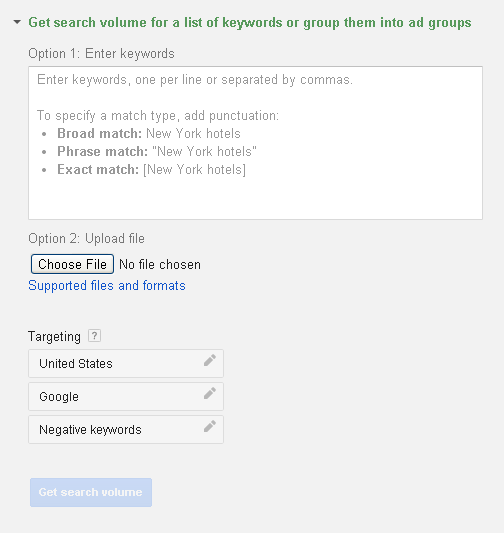
2. Enter or upload keywords to see how they (keywords) perform
Advantages: Able to determine the exact number of searches and CPC for that specific keyword
Disadvantages: Slightly complicated as it highly dependable to symbols
I uses this more than the previous one. In fact, this is a great SEO tool if you want to have exact (not estimated) keyword search or CPC cost per keyword.
Here are the legends you need to know in order to use this function:
Broad match – Blogging
Phrase match – “Blogging”
Exact match – [Blogging]
In broad match, keywords found could be related and non related to blogging. This gives you a general result and honestly speaking, it doesn’t help much when it comes to finding the exact keyword.
Keywords found using phrase match are highly related to the term ‘blogging’. This means that it could have the basic word of ‘blog’ in the keyword or simple having the same meaning as ‘blog’ or ‘blogging’.
Exact match keywords is what we are looking for. For example, searching for the term [blogging] would give us 14,800 searches. This is a strip down of the whooping, 71,000 searches that we had found earlier.
When it comes to finding the best or the most profitable keyword, it is highly recommended that you uses Exact Match feature to get the best results.
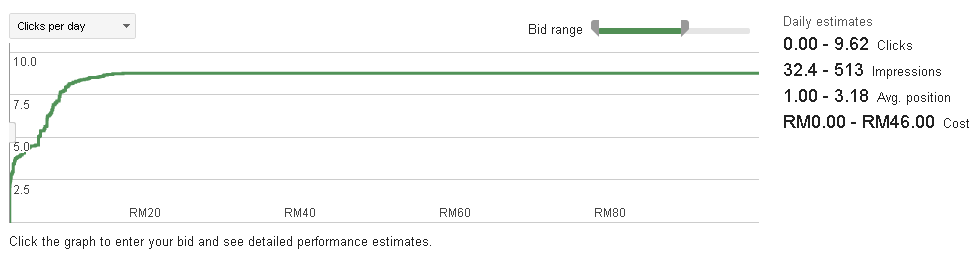
3. Get traffic estimates for a list of keywords
Advantages: This feature provides bloggers with number of clicks, impressions and cost per day.
Disadvantages: It is very ‘sales oriented’ and is more focus to Google Adwords users.
I would say this is pretty clear cut. Enter a keyword or more and Google Keyword Planner will give you an estimation of traffic.
Regardless of the disadvantages, I would still consider this as a great tool especially when you are looking to invest into into Google Adwords.
4. Multiply keyword lists
Advantages: This is good for cross matching keywords
Disadvantages: Chance of wrongly matched keywords is high and this is a rather ‘advance’ feature
Basically, this particular Keyword Planner feature helps you to create multiple keywords and in some ways, this increase the chances of finding long tail keywords.
All you need to do is to place two different sets of keywords in List 1 and List 2 as seen in the image below. After that, click on the ‘Get search volume’ as below:
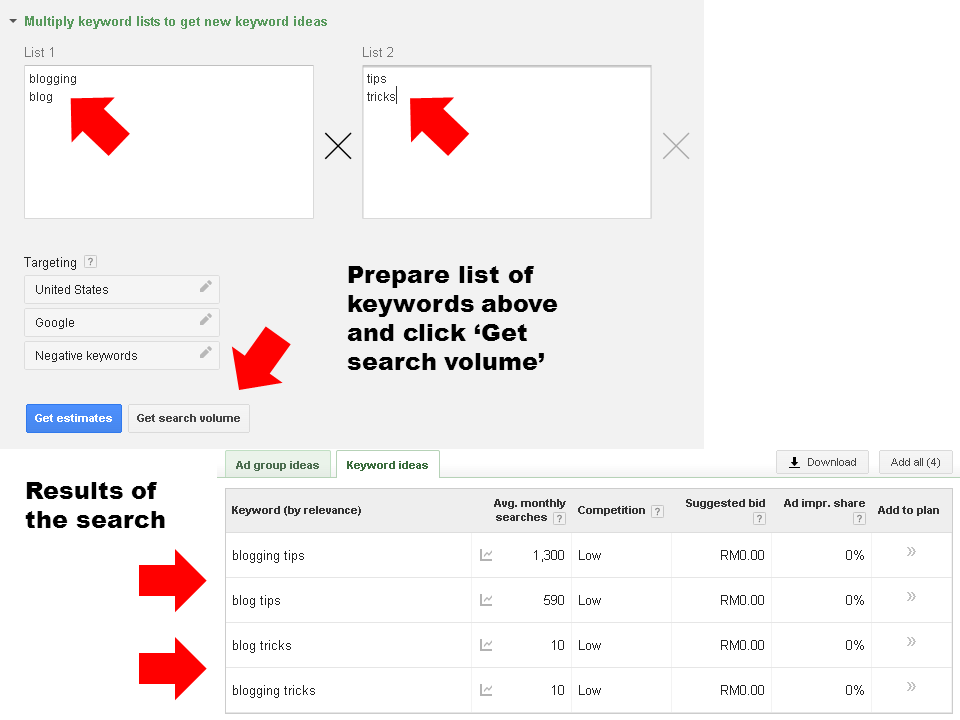
This feature is great especially when you are trying to find different keywords (mix and match) and if you are lucky enough, you might land yourself a low competition keyword.
How do you find keywords using Google Keyword Planner – Video form
Did I miss out anything about Google Keyword Planner?
I hope the above explanation would be worth a little especially when it comes to keyword research. Personally, Keyword Planner is a great tool especially when it has several more features compared to the previous version.
What do you think about Google Keyword Planner? Hit the reply button below and tell me what you think.


![[Contest] Win 1 of 5 Blog Engage Standard Accounts](https://www.reginaldchan.net/wp-content/uploads/2013/09/blogengage.jpg)