In this post, I am going to share with you 12 of the best mailing list plugins that will supercharge your list building campaign and increase your conversion rate.
I could not emphasize enough the importance of starting a mailing list. As a self-claimed plugin junkie, I find it very difficult to work with the just your average plugin. Instead, I wanted to work with the best plugin available to ensure that I am grabbing all the chances available to me.
As a blogger, you might be wondering which is probably the best plugin for your money and just like me, you want to make sure every visitor is converted into loyal subscribers.
Related: 30 Best WordPress Social Sharing Plugins For 2015
The best of the best mailing list plugins for 2014
10 of the best mailing list plugins for bloggers in 2014
In this article, I will cover 10 of the most popular, recommended and best mailing list tools that is guaranteed to skyrocket your mailing list building for the upcoming 2014.
Best mailing list plugins with advance features – Hybrid Connect
Hybrid Connect or HC is a tool that offers feature rich mailing list options for bloggers
When it comes to the best mailing list plugin, Hybrid Connect is certainly one of my arsenal when it comes to list building. It offers a vast variety of ready-made templates which fits perfectly into:
Pop up
In-text (content area)
Slide in
Widget areas
Squeeze page
Integration with videos and webinars
Setting up Hybrid Connect is easy and probably one of the easiest among all the plugins I have tested. Besides that Hybrid Connect also makes it easier to create multiple sign up forms with the form builder feature, video opt-in and split testing.
Your visitors can also sign up using their Facebook account using Hybrid Connect which is a great way boost conversion rate.
What I truly love about Hybrid Connect are the automatic responsive designs to fit any browser or layouts and as well as the quick response from support team for any inquiries.
Hybrid Connect costs $49 for single site, $67 for multi site and $147 for a developer’s license. It comes with a full 30-days money back guarantee if you are unhappy with the plugin.
Best mailing list plugin for easy usage and integration – OptinSkin
A plugin that does everything it is suppose to do; build a mailing list … fast
OptinSkin is probably the best mailing list plugin (alternative) for many bloggers. So, what makes OptinSkin so popular?
Personally, OptinSkin offers one of the best skins I have ever seen in a list building plugin. All the designs and layouts are perfectly done. This means that all you need to do is to integrate your mailing list provider code into OptinSkin and the rest is self-explanatory.
OptinSkin offers several features such as:
Fade out forms
Pop ups
In-text (content area)
Widget areas
While many other list building plugins are offering different packages, you can get OptinSkin with just one price for unlimited usage, $67. It also offers a full, 30-days money back guarantee.
The revolutionary mailing list plugin – OptinMonster
The latest, ground breaking and game changer mailing list plugin
When you have two of the best WordPress developers working together, you get probably the best mailing list plugin for 2014. Syed Balkhi from WP Beginner and Thomas Griffin from Soliloquy slider are the ones behind this game changer plugin.
I am not going to lie to you; OptinMonster offers around the same features Hybrid Connect, OptinSkin or probably a dozen more plugins.
So, what makes OptinMonster … such as monster when it comes to mailing list building?
Introducing ‘Exit Intent‘ from OptinMonster. For me, this is the groundbreaking, mind blowing and explosive feature every mailing list plugin should have.
Exit Intent is basically a feature which tracks the mouse speed and your visitors gestures. When OptinMonster detects they are about to leave your blog, it will automatically trigger a pop up to ‘lure’ you to stay longer and build a bigger subscriber’s list.
Personally, I call Exit Intent as ‘smart pop-up’.
Exit Intent is a feature because over 70% of your visitors will NEVER return and it allows you to capitalize on that with Exit Intent and extremely powerful targeting features.
While OptinMonster could probably be the best mailing list plugin for bloggers, and Internet Marketers, it costs $49 for a basic account, $99 for a plus account, $199 for a full year license and $349 for lifetime licence.
Now, if the price is driving you away, don’t be! OptinMonster offers 14-days money back guarantee for all packages and thus, you know your money is in good hands.
The best ‘all-in-one’ mailing list plugin – Subscriber’s Magnet
Subscriber’s Magnet offers a full list building ‘package’ at a very affordable price
For those who are already building a list, Subscriber’s Magnet from MaxBlogPress is already a household name. Subscriber’s Magnet is probably one of the only ‘all-in-one’ plugin that offers everything you could ever wished for such as:
Optin form within post, embedded inside comment
Pop up
Facebook connect feature
Exit pop in
Header and footer bars
Form auto filler
What make me really attracted to Subscriber’s Magnet is that it offers a huge range of features which I could leverage especially when it comes to building a list.
You can try Subscriber’s Magnet for $1 for the first 14 days and after that, you can either choose the $37 for single site usage or $97 for multi site usage.
The best value for money mailing list plugin – WP Lead Magnet
The newest and the only plugin that is smart enough to automatically enable and disable view
This is the latest plugin I came across and it really brings mailing list building process to the next level. Basically, WP Lead Magnet works in a very distinct way where each widget or sign up form will interact with each other to maximize the conversion rate.
For example, news visitors to your blog will see sign up forms on the sidebar, in the content area and after post. Once they have signed up using any of these forms, the rest of the forms will automatically disappear from their view.
This means that you utilize the spaces for banners, related post links and many more. At the moment, this is the only list building plugin which offers such feature.
While this is probably the newest plugins available, it is highly recommended by Neil Patel and it had proven to be useful by increase conversion rate by over 317%.
WP Lead Magnet costs $47 and as usual, it comes with a full 30-days money back guarantee.
Popup Domination is already a key player in the mailing list industry. While it doesn’t offer features such as sidebar widgets, popup is highly effective in terms of list building.
Why should you consider Popup Domination?
It is simple to use and lightweight. For those who are looking for a very simple solution to build a mailing list using popups, this is certainly one plugin you need to consider.
Popup Domination offers:
A/B testing
Full analytic reports
Page specific popups
Display frequency
Force subscribe
Entry and exit pop up
Popup Domination cost $77 and 60-days money back guarantee (plus refund after 60 days on a case-to-case basis).
The best low budget mailing list plugin – Ninja Popups
Ninja Popup is cheap and does its job perfectly
Is Popup Domination is too expensive for you? Don’t worry! There’s where Ninja Popups comes into play.
It is used by thousands of blogger and is in fact, one of the most popular product sold on CodeCanyon with over 4,000 sales.
Ninja Popups offers:
Opt-in locker
Multiple themes and skins to choose from
Social locker feature
Mobile responsive and suitable for all layouts
Quick 24/7 support
If you are looking for a simple plugin to start off with mailing list building, this is one tool you must not miss out.
Ninja Popup – Simplicity at its best!
And if simplicity doesn’t make the cut, you probably won’t go wrong with this plugin. It costs only $18 and is in fact, one of the cheapest plugins that offers great returns.
What makes Hello Bar such as an important tool when it comes to building a mailing list?
Hello Bar is not a mailing list plugin but with it’s features, credibility and support, I believe it deserves to be in this top 12 spot. Hello Bar is a notification bar that could boost your conversion rate multiple times.
While the success of using a notification bar is highly dependable to your blog, report and studies had shown that it is indeed a great move to build a mailing list.
To name a few, here are some authority sites which are using Hello Bar:
QuickSprout
KISSmetrics
Kikolani
For me, Hello Bar is a great tool to increase subscribers as that little small bar at the top can literally fetch thousands of subscribers without you knowing.
And yes, currently it is free for all and therefore, I see no reasons why you shouldn’t use it.
Foo Bar allows you to customize your notification bar to places you have never imagine before
I came across FooBar when I was trying to find a more custom notification bar. As much as HelloBar is a great tool to start with, I always wish to have a better control over my site. For example, I wanted to remove the ‘H’ brand and make it more unique.
FooBar offers:
Unlimited usage
Conditional logic
Rebrandable
100% customizable
Top or bottom bars
Twitter and RSS feed integration
FooBar only cost you $14 for lifetime license and if you ask me, this could possibly be one of the best and cheapest investment I ever done in my entire life.
With the right CTA, FooBar could easily beat any list building plugins out there.
The best and affordable mailing list provider (not plugin) – GetResponse
GetResponse offers many inbuilt signup forms if you are tight in budget
Don’t get me wrong; GetResponse is not a mailing list plugin and I am sorry for the confusion.
But wait! Why did I even include GetResponse in this roundup?
When I published this article (Hybrid Connect vs OptinSkin review), some of my readers asked if there are other alternatives if they are tight in budget and do not want to invest in any form of plugin.
I totally get it and I actually tested running popups using my email marketing provider, GetResponse (and a few others). As far as I can tell you, it works pretty well and you certainly do not need to use a mailing list plugin just to build a list of subscribers.
So, how do you possibly leverage this from your email marketing provider?
If you are using GetResponse, you could easily build popup forms using the web builder as seen below:
Build stunning sign up forms using GetResponse Drag and Drop editor
This doesn’t only applies to GetResponse but also to over a dozen email marketing providers out there. Well, all you ever need is possibly time and patience.
While it is not pretty out-of-the-box, take sometime designing it and you would probably get the best and most complete signup form you ever need. Period.
Did I miss out anything or you have some other mailing list plugins (and tools) that you believe it should be included in? Use the comment form below and tell me what you think.
Hello Bar or Hellobar is a website notification bar which is said to be a great way to direct traffic and promote your website’s most important content.
So, what is a Hello Bar?
Hello Bar is a web notification bar which appears at the top of the screen. As of now, Hello Bar is free for all but words from the support team is that it will become a premium service soon.
Hello Bar is a simple website notification bar (some call it web toolbar) which displays important messages, content URL’s or simply asking your visitors to sign up for you newsletter. Yes, that’s the bar you are probably seeing on the top of your screen right now.
While this is a very powerful advertising tool, it could be pretty ‘nasty’ to deal with especially when you have a Content Delivery Network running on the background or having minify setting turned on. Plus, I am using CloudFlare custom page rules which made my Hello Bar not working at all.
Even though I decided not to use Hello Bar for that matter, I am still very interested to build something and thus, Google had just became my good friend (as always).
I came across this article and I said, “Hey, let’s make it happen!”
Yes, I am talking about building my own Hello Bar from scratch with the help of some tools I had in my inventory; Genesis Framework and Genesis Extender plugin.
In this tutorial, I will show you how you can actually build your own and custom-made Hello Bar alternative from scratch under 10 minutes.
How to build your own, custom-made Hello Bar alternative?
Basically, this is a 6-steps tutorial and no fuss, follow these steps and you should be rocking with your shiny Hello Bar in a few minutes time.
We will be doing these:
Creating a conditional rule (more after this)
Creating a custom widget area
Using genesis hooks to customize the widget created
Tag the conditionals to control the display of the Hello Bar alternative
Adding the text into the widget area
Style your Hello Bar laternative to make it looks prettier
Step 1 – Creating a conditional rule using Genesis Extender plugin
This would require Genesis Extender plugin and you can get a copy here (with 30-days money back guarantee).
Click on ‘Examples’ and select the location you want the website notification bar to be visible. Here are some of the common legends you could use:
All pages except front page – Is NOT Front Page
Front page only – Is Front Page
On posts only – Is Single Post
On pages only – Is Page
Once done, click on the Save Changes button.
Step 2 – Create a widget area for Hello Bar
In this step, you would need to create a new widget area for your website notification bar and Genesis Extender plugin makes it all look so easy.
Genesis > Extender Custom > Widget Areas
For the name, any name to label the widget area is fine. I used genesisbar as the name for my widget area. Remember to save the setting once it is done.
Step 3 – Using Genesis Hooks to select the widget area
On the same page, head over to ‘Hooks’ and using the drop down button, choose genesis_before.
Leave the rest of the settings as default and press save.
Step 4 – Tagging using conditionals
Head over to conditionals option and select the conditional tag you did earlier. Ensure the right conditional is checked and press save.
Once completing this step, you have completed creating a widget area for your custom Hello Bar alternative.
Step 5 – Setting up the widget area with text widget
You would be able to see genesisbar column in the widget section. The next step is to create a text widget area and paste this code in it:
<div id=”genesisbar-pusher”></div>
<div id=”genesisbar-wrapper”>
<div id=”genesisbar-container”>
Check out this link. <a href=”http://example.com”>Check it out</a></div>
</div>
All you need is to change the ‘check out this link’, ‘check it out’ and the link of the call-to-action button.
Step 6 – Styling your custom-made Hello Bar
By now, your website notification bar should be in place but the styling should be very weird. At times, your site might look broken.
Access your theme’s style.css file using FTP or sFTP and paste this code in it:
Once the page is open, click on Show/Hide CSS Builder which is the on the top right of the page. You will then see a sidebar pop-ing out from the left.
Scroll down the sidebar and you will see Custom CSS Editor and click on ‘Pop-out’ link.
Paste the codes above and you press save. Refresh the page and styling is done.
This is what it looks like after creating the widget and notification bar. Looks identical to the original HelloBar?
Your Hello Bar alternative is ready!
While this is a perfectly a good Hello Bar clone, there are one downside which the analytics part. Using the original Hello Bar, you are able to check on the analytics report such as the click-through-rates (CTR) but with this self coding, you do not have the luxury of such.
Moving forward, I feel Genesis Extender plugin is a great tool for any bloggers who are interested in custom theme customization and in this tutorial, it just prove how easy it is to use to create a custom blog feature under 5 minutes.
If you want to be successful in blogging and online business, you need to start a mailing list. You probably heard about the term ‘the money is in the list‘ and that if you think that is just for Internet Marketers, you are absolutely wrong.
It doesn’t matter if you are running a small blog or a corporate website; you need to have a god-damn mailing list! And when it comes to the best mailing list provider, you are spoilt with choices. With over a dozen email marketing providers around, we are constantly trying to get the best for our bucks. I mean, who doesn’t right?
Prior to this, you should know that I am a huge fan of AWeber and I eve wrote a review about it. Read all about AWeber here.
Recently, I was basically lured into the dark valley and got bribed by GetResponse with their 25% Christmas deal and being a human being, I was attracted to it … big time!
And I went through the whole process to migrate all my subscribers from AWeber to GetResponse and it was merely to leverage from the Christmas deal while giving it a go.
Yes, call me crazy.
Important disclaimer:
I know there are probably hundreds or thousands of posts about AWeber vs GetResponse and seriously, I find them not much of a help as they are merely focusing on selling! In this review, I will be sharing with you what I think about both email marketing providers and of course, my personal opinion as a paying user myself.
AWeber vs GetResponse – The no-BS review
In this review, I will sharing with you several criteria for my judging and thus, feel free to head to the relevant section for my write up. Of course, this could possibly be a very long review indeed!
Criteria used for judging:
Overview of both the email marketing companies (what?)
Web signup forms designs
Integrating with third party mailing list plugins
Newsletter creation
Autoresponder ability
RSS to email feature
Drag and drop editor
Email delivery rate
Ease of importing contacts
Single opt-in and double opt-in
Customer service and support
The pricing factor
While this is definitely going to be a huge list, I recommend you to bookmark this for future reference.
1. Background check of AWeber and GetResponse
AWeber
AWeber was founded back in 1998 and it was then a huge hit when it comes to email marketing. As off 2011, AWeber was home to over 100,000 customers globally. By now, I believe they are serving over 300,000 clients worldwide.
AWeber is used by several key figures such as Ileane Smith, John Chow and Adam Connell. For me, I love AWeber’s professional designs and outlook.
Some claimed that AWeber is probably the best email marketing provider in the world.
GetResponse
GetResponse was founded back around the same time with AWeber and it is a great alternative to AWeber. At the moment, GetResponse has over 300,000 clients internationally and is one of the most interactive email marketing providers I ever come across.
GetResponse is actively used by many bloggers, marketers and even huge corporations as well. Just like AWeber, it gets tons of great reviews from popular sites such as Mashable.
There are also many die-hard fans for GetResponse when it comes to choosing the right tool to build a mailing list.
Winner: There ain’t any winner in the background check. Both are highly creditable and reputed. Therefore, this is a draw.
2. The battle of web forms and designs
If you want to sky rocket your mailing list creation, you got to have beautiful signup forms that converts.
AWeber
I have been using AWeber for over 8 months before this and I got to admit, I love their well-designed sign up forms. At the moment, AWeber has over 140 beautifully crafted sign up forms to woo your visitors to sign up.
Creating a sign up form on AWeber is easy and it offers 4 types of form such as inline, pop up, pop over and lightbox. For me, most of the sign up forms are beautiful and thus, it save me a lot of time when it comes to modification and this makes AWeber pretty much ready out-of-the-box.
AWeber has a great Drag and Drop editor for designing forms but I think that is absolutely not needed since it comes with some very attractive ready-made templates.
Now, if you are still unable to find a right template for yourself, don’t worry! AWeber team could provide support and even create a custom template for you! Yes, no joke!
GetResponse
GetResponse is something new to me and I am highly attracted to their very leisure outlook. You know, the vibrant colours and fonts … you get the point.
When it comes to build a sign up form, GetResponse is pretty much opposite from AWeber. Of course, I am more towards the lazy type and expects a lot from my email marketing provider. In terms of sign up form designs, I find that GetResponse is pretty much not overly attractive. They are pretty plain in some way (I am comparing highly to my site only) right out-of-the-box to be honest.
However, don’t get fooled with this. GetResponse is very powerful since it has a great Drag and Drop editor which I love to call to WYSIWYG (what you see is what you get). This means that every form you build is according to your liking.
Winner: Since I am a huge believer that email marketing must be easy and less time consuming, AWeber is the clear winner here.
3. Easy of integration with other mailing list plugin
AWeber and GetResponse are equal in this comparison. The main reason is because both of these are very popular email marketing providers and thus, it is a no brainer to include easy integration with most of the mailing list builder plugins.
Sign up forms generated with AWeber and GetResponse comes with both scripts and HTML codes which you can easily use and integrate to any plugin under 10 seconds flat.
Furthermore, both offers features such as:
Self installing the codes
Emailing the codes to your developer(s)
Hosting it through AWeber or GetResponse servers
I have tested with several optin plugins such as Hybrid Connect and Optinskin. Integrating both email marketing providers is as easy as A, B and C.
Winner: Draw
4. Creating a newsletter for your mailing list
AWeber
If you are interested to use AWeber, it is great for both HTML and plain text usage. Creating a newsletter using AWeber is easy as there isn’t any technical skills required. All you need is to choose the beautiful ready-made templates and you are probably all done and ready with it.
AWeber has spam score value which are auto calculated based on the number of images, links and number of sensitive words in your newsletter. This is definitely a good thing as having a high score will actually increase the changes your newsletter landing in the spam box. Certainly, something you wouldn’t want to right?
Once a newsletter is done, you are given two choices which you may decide to send immediately or schedule a different time. If you are deciding to schedule the newsletter, all you need to set is the time which is according to Eastern or Western time.
Of course, you can also decide which mailing list which will be receiving the newsletter (aka segmentation).
Personally, AWeber is great if you are very focused in text based newsletter.
GetResponse
Again, GetResponse is very opposite to AWeber and it is more focus in dynamic and responsive email newsletters. GetResponse has over 30 of ready made newsletter templates and all you need to do is to choose one that fits your need. Lastly, do some modifications according to your needs and you will be ready in no time.
Of course, if you are adventurous and hardworking, you can just use the Drag and Drop feature and build your own custom newsletter.
A huge feature which GetResponse has is that it comes with responsive email testing and preview. This means that there is an option for you to preview how the newsletter would look like on different smartphones, computer OS and even browsers! Oh yes, if you think that I am joking, I am not!
Here’s what it (called as Inbox Preview) looks like:
Inbox preview is a great feature to check on the email layout on various devices
GetResponse also comes with spam score but it had to be done manually (one click button).
Wait!
There’s one more thing you should know about GetResponse; the revolutionary time-travel. With time-travel schedule featured enabled, all newsletters will be send out according to your subscriber’s local time. This is a mind blowing feature since you obviously do not have all subscribers living in the same town or time zone.
Winner: I would go with GetResponse as I felt each newsletter would be more customized and personalized thanks to the effective Drag and Drop feature. Also, with the latest Gmail update on images, having more images in your newsletter would be a good ‘investment’. Of course, the time-travel feature by GetResponse is definitely a no-brainer winner over AWeber in this comparison.
5. AWeber vs Getresponse review – Autoresponder ability
Autoresponder is a great feature to attract loyal readers back to your site and keeping them informed of the latest updates.
AWeber
Creating an autoresponder is easy and all you need is to create multiple emails (called as follow up emails) plus, setting up the time to be send accordingly. Here’s an example:
AWeber autoresponder feature is popular for email automation
AWeber’s autoresponder feature is pretty straight forward and it is pretty well baked for users who do not require much of a beautiful user-interface (comparing to GetResponse).
GetResponse
GetResponse does everything the same as AWeber and with some twist. You would be able to decide each autoresponder to be send according to:
Time based (right after subscription or x days later)
Upon actions such as after a click on any links in specific email
Upon actions such as after opening a specific email
Self defined goals that you create (click through rates, engagement level etc)
While this may sound hazzy at first, this means that GetResponse autoresponder is more versatile and provides a more custom-made experience for you and your subscribers.
Multiple goals and requirements can be used to trigger GetResponse autoresponder
Winner: For me, GetResponse is a better autoresponder since there are multiple ways to trigger an email. This means that you have everything it takes to create multiple goals that can be triggered by any goals or campaigns you had set.
Furthermore, having multiple options is a great way to boost your email marketing campaigns.
6. RSS to email feature
This is one email marketing feature which is very powerful and can determine the success or failure in luring your readers back to your site. Basically, all you need is set once and forget.
AWeber
I was addicted to AWeber RSS to email and used it for a course of around 2 months. Setting up is extremely easy and AWeber provides you two options which are automatic and manual.
In automatic, you need to set the time and the number of RSS collected on AWeber. Once it reaches the goals you had set, an email will be send out automatically to all your subscribers.
However, it is not the case for the manual feature. Instead, emails will be created automatically and placed in your draft folder. You would then need to manually send each email (assuming after you customize or checking it).
Personally, I tend to use more automated than manual but bear in mind that automation could means boring and you are killing the surprise factor.
GetResponse
Since I moved over to GetResponse and totally love their Drag and Drop editor, I basically ditched this feature. However, here’s my review on it.
Setup your RSS link with GetResponse
Set up the frequency of daily, weekly, monthly or anytime you like
Configure the total number of RSS collection before sending out
When it comes to RSS to email feature, GetResponse has only automatic feature and this means that it doesn’t go in draft unlike AWeber.
I would say this is a great addon to any mailing list campaign you are building. However, with the capabilities of the Drag and Drop feature of GetResponse, this could be one of the most under-utilized feature for me.
Winner: In terms of usability, I would give higher point to AWeber since it has the automatic and manual feature. It certainly a better feature when it comes to email customization.
7. Drag and drop editor
AWeber
Out of a scale of 10, I would say AWeber would score around 7.5 for this category. In AWeber, you get all the basic feature you could ever wished to build a newsletter, autoresponder etc.
If you are planning to use AWeber drag and drop feature, it is best used on a blank template since all the ready-made templates are already so perfectly done.
The only issue is that you got to get used to the layout of AWeber Drag and Drop before you can actually maximize its usage.
GetResponse
GetResponse on the other hands is highly focus in drag and drop feature compared to AWeber. I would rate GetResponse higher with a score of 8.5 due to the fact that the feature is more ‘interactive’ with users compared to the above.
However, bear in mind that this is great option especially when you are picky (like me) or would simply prefer a fully customized form.
The only downside for GetResponse is that it takes quite a bit of resources to get this feature running. Therefore, you may face a slower loading page if you are using an older computer.
Winner: I would give GetResponse the winning point here because I noticed it is able to perform better (in terms of functionality) as a drag and drop editor and the WYSIWYG feature really works well with this editor.
8. Which email marketing provider has a better email delivery rate?
Email delivery rate is important as we need to ensure that our subscribers get those email newsletters promptly and at the right time for the maximum effect.
AWeber
Through my 8 months with AWeber email marketing, it has never fail me when it comes to email delivery. Every email is sent out promptly and sharp on the dot.
What else to say? Perfecto!
GetResponse
The delivery rate for GetResponse is pretty close to AWeber and I got to admit, probably on par for many if is not better.
Honestly, I had issues with time-travel delivery not once but twice during my first week with GetResponse. However, the support team was really fast in rectifying the matter and everything was back working in a very short period of time.
For your information, the issues I faced were caused by a technical glitch which affected my account only. Unlucky me!
Winner: While both are seriously on par, I would give AWeber the winning point here due to the technical error I faced during my time at GetResponse. Though it was just an unwanted error, it certainly affected me a little especially when I have such a high expectation.
9. Process importing contacts and security matters (subscriber’s view)
AWeber
Building a mailing list is all about contact and if you are importing contacts to AWeber, you are in luck.
It is pretty easy for backend users like you but it could be a hassle for your subscribers. By default, the process of importing contacts (bulk upload) to AWeber is a 3-steps process:
Import contacts to AWeber
AWeber will screen the emails to check for any anomalies
Contacts will automatically receive an email verification which they need to verify to subscribe to the mailing list
You can also upload contact manually to AWeber and everyone need to go through the same verification process.
Update: According to Brandon from AWeber, we (clients) could request to have this double opt-in feature removed on a case to case basis simply by contacting their customer support team for assistance. Personally, I have yet to experience this and thus, I leave it as a neutral factor at the moment.
GetResponse
By default, GetResponse automatically enables double opt-in for all subscribers. However, you are able to change this feature in the settings.
Compared to AWeber, I totally understand the reason behind this. Not all subscribers are happy (and keen) to keep ‘authorizing’ the newsletters (especially when you are moving from AWeber to GetResponse) and you might lose quite a number of loyal subscribers which could affect your email marketing campaigns dearly.
I would highly recommend to enable double opt-in for new mailing list subscribers to avoid spammers and disable this feature when you are importing your contacts (from other email marketing provider to GetResponse).
Winner: I would say GetResponse is a better winner compared to AWeber in this comparison as I am coming from the point of a subscriber.
Imagine having to verify subscription email another time and maybe, the subscriber could ignore it. I know maybe there are 60% of people out there who will still re-verify but honestly, I would rather not take any chances.
As stated above, AWeber is extremely strict when it comes to verification and thus, it is compulsory to verify through email before subscribers will be added to the your mailing list.
While this could be an extremely good move for you as a host, it could also prove an issue for some subscribers would consider it a hassle to ‘keep verifying’ especially when you are moving from one provider to another.
However, don’t forget that by verifying again, you could easily remove inactive users from your email marketing.
GetResponse
GetResponse is different from AWeber as it offers both choices for its users. By default, the double opt-in feature is enabled from the moment you start an account with GetResponse.
However, you can change this setting by going directly to the settings and turn off the double-opt in feature.
This is where you can decide when and what action would require to turn on the double opt-in feature.
Winner: For this, I believe AWeber is a better choice. In comparison #9, I gave GetResponse the winning point as that was during the process of importing email subscribers. However, this comparison is mainly on the users themselves and thus, I believe AWeber’s compulsory opt-in feature is a great move to avoid spam or any wrong doings.
11. Quality of customer service and support
AWeber
Customer service at AWeber is pretty top notch. They have a good respond rate and speed; through my experience, all email enquiries and supports are replied within 12 hours or less.
I would also give credit to them as they always come back with follow up emails and asking me if the problem is solved after a few days.
Coming from a customer service background myself, this is definitely more than just good customer service. It certainly make me believe that my mailing list account is in good hands.
AWeber has the live chat feature which is great and you can easily find it on the top left (green button). Their support team also operates 24/7 and you can even tweet them for assistance too.
GetResponse
I am going to be very honest here. GetResponse support team isn’t as good as AWeber.
However, what makes GetResponse on par with AWeber and the rest of the email marketing providers is the live chat feature. This means that you are absolutely sure that at anytime you need some help, chances are there’s someone listening and providing valuable assistance.
While AWeber has the live chat feature too, I noticed that GetResponse live chat feature is more visible and the button is located on the left side of the page.
Personally, while AWeber could probably have the best support team, it is always great to know that GetResponse support is just one click of a button away.
Anytime you need help about email marketing, just hit the live chat and someone should attend to you within minutes.
A draw back from GetResponse is possibly the fact that they do not operate 24/7 like AWeber does. So, this could be something you should be considering if you are the type that would require lots of support.
Winner: Again, I would call this a draw. Both has live chat feature which is good and the only difference is that AWeber is operating 24/7. So, go figure!
12. The pricing factor – AWeber vs GetResponse
Disclaimer: This is probably the biggest and most important factor when it comes to deciding which email marketing provider you are going to use and my review here is solely on budget and quality of service.
AWeber
AWeber is offering $1 trial for 30 days plus, a full 30-days money back guarantee if you are unhappy with the service. The below are AWeber pricing plans:
AWeber email service starts at $16.17 per month after discount
As you can see, pricing for AWeber is pretty steep. In fact, it is one of the most expensive email marketing provider in the market now.
GetResponse
GetResponse is offering 30-days free trial and no credit card required. This means that at anytime you are unhappy with the service, you can stop without a single cent charged to you (if you cancel within the first 30 days).
This is what GetResponse pricing looks like:
GetResponse pricing plans
Just like AWeber, GetResponse is also offering discount if you sign up for a yearly plan. What differentiate GetResponse and AWeber is that GetResponse do not have a quarterly plan.
On top of that, GetResponse also offers additional pricing for bigger email volumes such as the below:
GetResponse also provides bigger and customized plans
New users who sign up for GetResponse could also get extra $30 discount if they signup through a special discount code like this one, GetResponse $30 extra credit.
Winner: As much as I love AWeber, I would say that GetResponse is a better choice with bigger discounts and easier on the pocket. Also, GetResponse offers more email subscribers limit compared to AWeber which is also a huge plus point.
AWeber vs GetResponse – Which is the best email marketing provider?
Phew! That’s one hell of a review right? If you managed to reach here in one shot, I think I might need to treat you a mug of beer mate!
I even took 5 rounds to complete this article with over a dozen revisions.
Using the comparison above, here are the scores:
3 categories are draw between both email marketing providers
AWeber won 4 categories
GetResponse won 5 categories
With the detailed comparisons above between AWeber and GetResponse, which would be a better choice for you?
While you won’t go wrong with any of them, I would say GetResponse is much better due to the pricing factor.
Though I would probably get better customer service at AWeber, I could get twice the number of subscribers limit plus saving of at least $77 with GetResponse.
I hope you enjoy this long review and tell me what you think using the comment form below.
Also, here are the links which you can sign up for both the email marketing providers:
Nowadays, ranking for certain keywords on search engine is much tougher than previously. Years back, I could easily rank a two-words keyword within weeks but nowadays, it seems like forever.
Search engine optimization had not changed but it had just got harder.
I am a huge fan of organic search engine optimization techniques and recently, I came across a tool which is said to be (and possibly) one of the best keyword research tool out there.
Being an avid user of Long Tail Pro, I was really skeptical on the idea of using this tool but I thought, I would give it a go either way.
The below are my experience and of course, tell me what you think using the comment form below.
Improving search results using HitTail
HitTail does only one job (literally speaking) and that is providing you long tail keywords to further increase your blog traffic.
HitTail will provide long tail keyword suggestions to help you rank better
You can easily practise organic search engine optimization techniques in just 3 steps using HitTail. Yes, only 3 simple steps and you are probably having a good chance to rank better on SERPs.
1. Integrating HitTail code into WordPress blogs
Probably the easiest part of all. Upon registering (get your trial HitTail account here) for an account, a code will automatically be created for you.
The code looks something like this:
<!– HitTail Code –>
<script type=”text/javascript”>
(function(){ var ht = document.createElement(‘script’);ht.async = true;
ht.type=’text/javascript’;ht.src = ‘//123456.hittail.com/mlt.js’;
var s = document.getElementsByTagName(‘script’)[0]; s.parentNode.insertBefore(ht, s);})();
</script>
Copy the code and place it before the closing of </body> tag or wp_footer(). For those who are not using Genesis theme, you would probably need to find the related tag to place the code which wouldn’t take you much time.
Once that is done, you would need to wait for around 30 minutes or so (remember to clear cache for faster response) before HitTail would be able to detect the code and installation is complete.
2. Allowing HitTail to crawl and providing results
After your tracking code is verified, you will not be getting an immediate response or results you are looking for. It is best to wait for a few days before coming back to check on the results.
Basically, HitTail will record the source of your traffic and it will focus only on search engine traffic. As I had said above, HitTail helps to boost organic search engine optimization and it uses organic search results to provide you with the most relevant data.
HitTail provides several result options which are:
Search hits
Keywords
My HitTail
Suggestions
Search hits – This is where it gives you an exact information for the source of your traffic
Keywords – Keywords that visitors were searching which lands them on your site
My HitTail – Give you an outlook of the top 10 keywords of your search traffic and the number of long tail keywords that contributes to your traffic
Suggestions – HitTail takes a the list of long tail keywords (refer above) and provide you suggestions on future blog posts topics.
3. Searching for the best keywords for blogging
This is what it looks like on HitTail’s dashboard
With the above, HitTail basically does all the keyword research you ever need to do and give you (in return) a pot of gold. Now, the last step is to choose the right keywords from the Suggestions tab and start blogging!
Let’s assume that you are doing a niche blog and you are looking for a great writer to do it for you. Well, HitTail team thought of that too!
You can use the ‘Order an Article” button on HitTail and get a complete article for the price of $19. And if you think that it is some sort of low quality blog post, you are absolutely wrong.
These are written by professional and you are guaranteed a high quality post that is according to your requirements.
So, is HitTail worth it?
For me, HitTail is really an excellent tool for bloggers. If you are looking to invest time and effort into organic search engine optimization techniques, HitTail got to be in your goto keyword tools.
Content Delivery Network helps to boost website loading speed. If you want to rank well on search engines, getting your website speed up to par level is important. Even Google advise that sites should be loading at the speed not more than 1.4 seconds.
Brands such as CloudFlare, Incapsula and MaxCDN are no longer uncommon names when it comes to branding themselves as the best CDN providers. Before we go any deeper, let’s take a quick dive on what CDN totally means to a website.
What is a CDN and how it helps increase website loading speed?
Content Delivery Network is a large distributed system of servers deployed in multiple data centers across the Internet. Simply by using a CDN, webmasters are able to serve static content to their readers or visitors from various data centers which are closest to the readers.
And this means that websites will load blazing fast. Yes, I mean like sonic. Okay I am just aggregating but you get the point.
Sites loading over 3 seconds should seriously consider using Content Delivery Network to ensure that they are not losing visitors. Still not convinced?
The web should be fast – Google Inc.
1% increase in revenue for every 100ms of improvement – Amazon
One of the biggest misconception done by bloggers are paid Content Delivery Networks are equivalent with the free CDN services. The truth is, they are miles apart.
The most important part to remember is that free CDN providers usually offer limited cache resources compared to premium ones. Nonetheless for those bloggers who are on tight budget, starting off with free Content Delivery Network services could be the best choice among all.
In the market right now, there are only two Content Delivery Network providers which you should really consider when it comes to caching and performance which are:
CloudFlare is one of the most popular CDN provider for many bloggers. It has also partnered up with hundreds of hosting providers to ensure that web hosting clients are able to sign up for CloudFlare and enable it with just a few clicks of the button.
It is one of the most recommended CDN by many hosting companies as it is easy to integrate and it could easily speed up a blog within minutes. As a matter of fact, CloudFlare guarantees that they will supercharge your site in just 5 minutes.
All you need to do is to set it up (even by default is fine) and that’s it. No special settings needed … ever!
For bloggers who are looking for faster website loading speed but at the same time on tight on budget, they can easily use CloudFlare Page Rules to ensure that CloudFlare is caching more static resources on its servers. If you have no idea what it is or how it works, you can refer to this article for more information, How to setup CloudFlare Page Rules.
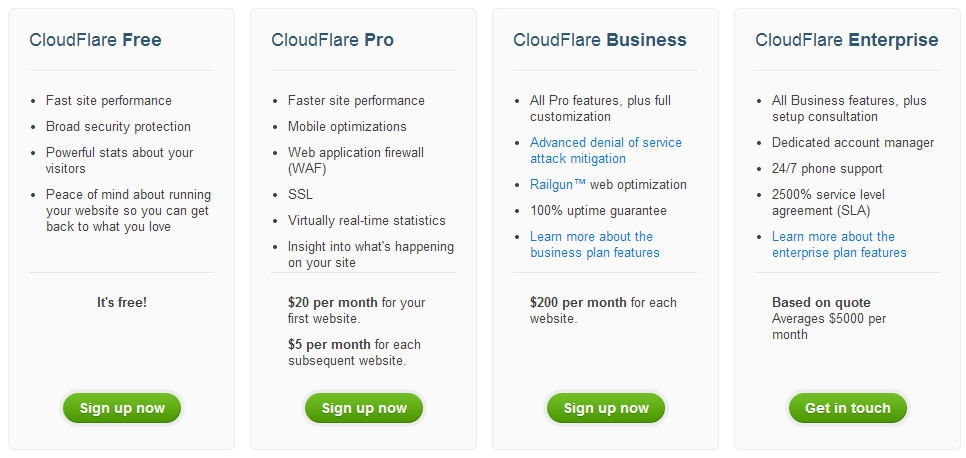
While CloudFlare offers unlimited free accounts for everyone, you may still opt for premium plans which starts from $20 per month. Here are the current plans CloudFlare are offering:
While CloudFlare is a great CDN choice for many bloggers, it could also be a huge problem for some as CloudFlare has the tendency to block visitors of several IP’s and country specific. Even though the odds of this to happen is relatively low, it is definitely something to consider before deciding to use CloudFlare.
Best CDN for Security Protection: Incapsula
Incapsula uses a global content delivery network to provide website security, DDoS protection, load balancing and failover services to clients. For most bloggers, Incapsula is a great alternative for CloudFlare when bloggers are trying to install CloudFlare for their sites.
So, what is Incapsula offering compared to the rest of the CDN services?
When it comes to security, Incapsula could probably be the #1 on the chart. Among all the free CDN providers available, Incapsula is one of those who offer top notch security features and lots of addon features other CDN providers might not be offering … for free.
For blogs who are always hit by spam bots, Incapsula could be a better choice for CDN service as it comes with Bots Protection feature which is said to counter attack automated spammers.
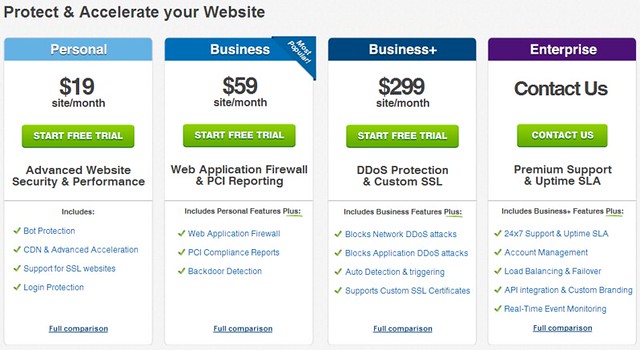
Incapsula offers both free and premium CDN services which started from $19 per month and here are the plans it is offering:
Can’t decide which free CDN provider to use? This article could help, CloudFlare vs Incapsula.
Most Popular Premium CDN for performance and price: MaxCDN
When it comes to premium Content Delivery Network at a good price, nothing beats MaxCDN. It is trusted by many top sites such as Yoast, ZippyKid, The Next Web and WPBeginner.
So, what makes MaxCDN so popular?
Global flat rate pricing
Free HTTP & HTTPS requests
Instant purge
24/7 customer support (including live chat)
Supercharge and make sites blazing fast
Easy integration with W3 Total Cache and thousands of hosting environment
I use MaxCDN because I am always a speed junkie. I want my site to load extremely fast and I always aim for the 1 sec mark. Without MaxCDN, I was loading around 1.8 seconds on average and with MaxCDN, I was rocking at below 1 sec (608 ms to be exact).
This is how fast my site loads after enabling several custom settings
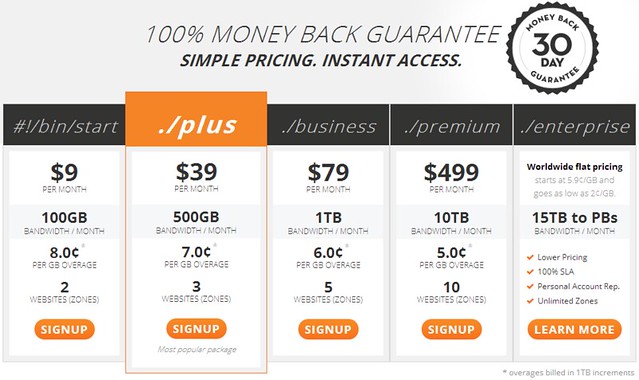
MaxCDN offers very competitive rate which starts at $9 per month (for 2 websites) and an allocation of 100 GB per month. I am no big fan of monthly payment and if that is the case, take up the annual plan and get 2 months free.
For those who are interested to make your website even faster, I would highly recommend you to use W3 Total Cache Pro + CloudFlare Page Rules + MaxCDN. Of course, this is when you are serving lots of images and JavaScripts which could affect the loading speed severely.
Give MaxCDN a 30-days trial run for free and upon sign up, get 20% off instantly with coupon code Max20. Click here!
Is your website loading over 1.5 seconds or do you want a faster website?
We all know the importance of having a fast loading website. Analytic sites such as Moz and QuickSprout has always recommend a quicker loading site if you want to rank well on search engine. If you are not using any CDN service yet, I would recommend you to grab either one of the above immediately. Not only you will have a better chance to rank well, you are going to make your visitors happy too!
Are you using any of the Content Delivery Network providers above? Tell me what you think and share your CDN experience with me using the comment form below.
I thought that Google PageRank Update last week was the only gift from Google for the year. Guess I was wrong.
When I saw this Google announcement, I was smiling. I knew that my Internet marketing campaigns are going to skyrocket immediately after this Gmail update.
For those who are wondering what I am talking about, Gmail has announced that all images attached in all Gmail emails will be automatically displayed by default.
Google first announced the usage of Display All Images setting to ensure that Gmail users are not getting unwanted images from unknown sender which could compromise the security of their computer or mobile devices. As much as it was considered a good move for users, it wasn’t the same case for marketers.
An image represent a thousand words and one of the best ways that Internet marketers use to encourage readers to continue reading (and in some cases, purchasing an item).
Gmail display all images feature is enabled automatically
With the new feature, instead of serving images directly from their original external host servers, Gmail will now serve all images through Google’s own secure proxy servers.
This means that your messages are (assumed) to be safer and more secure as Google will have a layer of protection to check on viruses and malware. The Display All Images or Display Images options on your Gmail will not be visible anymore.
Gmail team had also said that this will roll out soon (expected by this week) for PC’s and it is expected by next year for smartphones.
Question: How can Internet Marketers and bloggers profit from this update?
Gmail Display All Images feature can be very annoying. Yes, let’s be frank.
How many of you actually click on the pesky ‘Display Images’ button every time you receive an email from a trusted site? One thing for sure, I know I don’t unless the email is really interesting.
This means that with the Display All Images features enabled by default, you can probably kiss good-bye your email marketing campaigns if your emails are based highly on images.
So, what are the advantages you can gain with the images displayed automatically?
1. The possibility of increasing click through rates (CTR)
For those who are sending out newsletters and uses many images as a form of description, chances are your response rate is going to skyrocket.
Previously, readers will not be able to see the images if the Display All Images option is not turned on or the sender isn’t whitelisted. Now, images are all shown automatically and thus, you can leverage traffic with images from your blogs and even using 3rd party applications such as Pinterest and Flickr to host your images.
2. Using more image-rich newsletter templates
Before this, my newsletters contain mostly words and it is pretty clear cut. While it may sounds lame and boring, this is probably the best method to reach out to many recipients. Before this, I was using AWeber and it was great especially when it comes to sending text emails.
I totally understand that while having tons of images could easily increase the click rates (and boost anxiety), it is tough to do so if readers do not enable the Display All Images or whitelist me as a safe sender on their Gmail account. So, it makes all the sense to use more words than images in all my newsletters.
When it comes to image-rich newsletter templates, email marketing providers such as AWeber and GetResponse are top of their class. With the Gmail enabling Display All Images automatically, it makes absolutely all the sense to start using quality images in your newsletter to boost CTR and of course, building prettier newsletter templates.
Here’s a video I found about GetResponse about image-rich and responsive designs:
3. More personalized emails and lesser automated ones
While email providers such as GetResponse and AWeber offers RSS-to-email feature, this could probably be a turning point (at least, for me) of it with the Gmail Display All Images feature enabled automatically.
I got to admit that RSS-to-email features got me pretty lazy. Trust me on that!
Imagine you have a tight schedule and right after publishing a new blog post, your email marketing provider automatically create a newsletter and send it out to all your subscribers at the scheduled time. I bet it certainly sounds good right?
I have tested that and I got to say that it is one insanely crazy and great way to boost traffic and building a stronger brand power.
However, the side effect is that you are basically putting it on automation which could (most of the time) totally kill your human touch. This means that every email sent out would look like ‘˜that’ and for eager subscribers, that could be a huge turn down.
What’s next? A huge drop of subscribers!
So, what does Display All Images by Gmail could possibly affect my marketing strategies?
The answer is simple; I tend to build (again) my own customized emails instead of using RSS-to-email feature completely.
Even though this might not be the best advantage with the new and updated Gmail Display All Images feature, it is certainly a good way for me to kick start (back) semi-automatic newsletter.
Over to you
Now tell me guys. How did this update on Gmail image display feature affects you? Tell me what you think using the comment form below and let’s discuss.