WP Engine is said to be one of the best managed WordPress hosting on Earth. If my memory serves me right, I heard about WP Engine back in 2011 and I told myself that if one day I get really seriously in blogging, WP Engine will be my one and only hosting.
And here I’m, happily hosted at WP Engine after some years of struggle.
So, why would I actually decide to migrate over to WP Engine? Here are several to die for reasons:
- No cache plugin needed (WP Engine takes care of it for you)
- Bullet proof security (if you ever get hacked, WP Engine will rebuild your site for free)
- International data centers (choose between USA, UK and Japan)
- Higher plans comes with premium Content Network Delivery (CDN) for free
- One-click staging area
- Expert support (everyone in WP Engine knows about WordPress and you know you are going to get 101% support there)
Here’s my podcast on the benefits using WP Engine web hosting:

How to migrate a WordPress site to WP Engine?
Migrating your current WordPress hosting to WP Engine could be a little challenging as WP Engine runs on their own ‘cPanel’.
I did asked for several quotes and they ranged from $100 to $500. My friend even offered to do migrate my site for free and I nearly took his offer … until I decided that I should try by my own.
Yes. Call me crazy!
I was prepared to spend more than 12 hours to migrate my whole site but the whole process took less than 3 hours (which includes a few smoke and toilet breaks).
If you are wondering how hard it was, it is about 3 out of a scale of 10. So yes, it is easy if you know what you are doing.
In order to migrate your site successfully to WP Engine, you need to do:
- Ensure that you are running the latest WordPress and all your plugins are updated
- Import your website database from your existing hosting
- Export your website database to WP Engine
- Transferring WP-content folder to WP Engine
- Redirecting traffic to your temporary URL
- Configure your DNS setting to point to WP Engine
Now, I am going to guide you step by step which if you follow closely, the WP Engine migration will be a brief. Plus, saving you a couple hundred of bucks.
Important note:
- Your website will still be visible (up and running) on your current hosting until step 5
- Do not inform your hosting company that you are terminating the service as some companies might immediately block your access
Step 1 – Updating your WordPress and plugins
This is crucial and it goes out to all website migration. Before doing any migration service (paid, free or do-it-yourself style), always make sure that your WordPress database and plugins are updated to the latest version.
A simply upgrading (or update check) could prevent a lot of common migration issues.
Optional:
- If you wish, you could also disable all your plugins before the migration.
- Please ensure you all disallowed plugins are not activated (best to delete) or else there could be issue arises after the migration process. Find the full list of WP Engine disallowed plugin here.
Step 2 – Import your current WordPress database
In this migration step, you need to login to your phpMyAdmin and if you have no idea what is the login credentials are, get in touch with your hosting providers. They would be able to provide you with the information.
Upon logging in, you will be seeing a column on your left with a list of database(s).
The theory is that you need to download the correct database and upload it to WP Engine. In other words, copy and paste … literally.
For those who are having multiple databases due to shared hosting packages, no fuss. Open your wp-config.php file and look for a similar line of codes like this:
define(‘DB_NAME’,’example_db’);
Click on the correct WordPress database and click on the button ‘Export’.
Select ‘Custom’ for export method and in the ‘Tables’ box, click ‘Select All’.
Scroll down until you see the ‘Format’ settings and select ‘SQL’.
In the ‘˜Object Creation Options’ box, select or enable the following:
- ‘˜Add DROP TABLE / VIEW / PROCEDURE / FUNCTION / EVENT statement’
- CREATE TABLE options
- ‘˜IF NOT EXISTS’
- ‘˜AUTO_INCREMENT’
- ‘˜Enclose table and field names with backquotes’
For the rest of the options, you may just leave it as default and of course, the last step is to click ‘Go’. The database will automatically be downloaded to your computer with a .SQL extension.
Important note: You should not be doing any changes to your site as latest changes will not be captured in the database you have downloaded. Yes, this means that even new comments will not be visible once you completed your migration to WP Engine. Therefore, you should perform a website migration during your lowest traffic hours or use a temporary redirect option.
Step 3 – Exporting your database to WP Engine
Exporting your database to WP Engine is very easy compared to downloading it in step 2. Login to your WP Engine client portal and under the ‘Install’ table, click on the right installation name.
Click on ‘phpMyAdmin’ and select on the database without the ‘snapshot’.
For your info, snapshot database is your staging area database.
In this database, you will be able to see the default files and your next step is to replace all of them with the database you downloaded earlier.
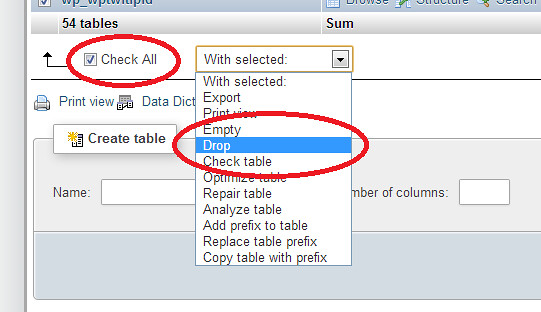
Click on ‘Check All’ and select ‘Drop’. The system will ask for your permission and click ‘Yes’ to proceed. This will remove all the current database in your hosting.

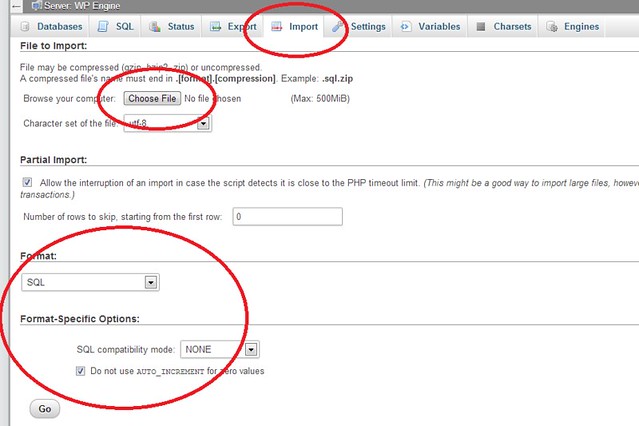
Next, click on the ‘Import’ button and select the downloaded database you had earlier. You may leave all the current settings as default and select ‘Go’.
Tip: Depending on your Internet speed, this could take awhile. You may take a break now or multi-tasking by doing the next WP Engine migration step.
Step 4 – Transferring WP-content folder to WP Engine
Managed WordPress hosting is different from any other hosting services. While shared hosting services like HostGator has a simple login, download and upload button for your WP-admin, you can’t do that with WP Engine or any other managed WordPress hosting as a matter of fact.
Instead, you need to use FTP tools like Filezilla or CyberDuck (recommended) to perform any upload and download. Also, you will be SFTP instead of the normal FTP for security reasons.
All you need to do here are:
- Login using SFTP
- Head over to your WP-admin
- Upload the whole WP-content folder to WP Engine and make sure you override the current folder
Important note:
- Do not override wp-config file seen on wp-admin. If you had accidentally override it, it will cause your site to be inaccessible and contact WP Engine support to reinstall the file for you.
- Any other resources that are not stored in the default WordPress location will also need to be manually transferred.
Step 5 – Redirecting traffic to WP Engine temporary URL
By now, you have completely transferred all the important files over to WP Engine and you are just moments away from starting your hosting. Yes, this step will redirect all your traffic from your old host to WP Engine.
There are several ways you can perform this step such as:
- Emulate DNS change with the Hosts File Trick and add domain in client portal
- Update database with temporary URL
Personally, I prefer to go for the second option as it is much easier and straight forward for me.
All you have to do is to access your ‘phpMyAdmin’ on WP Engine client portal and select your database (without the snapshot).
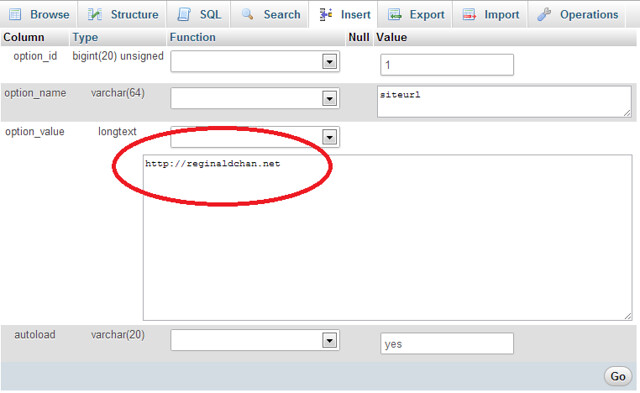
This will open a list of tables and search for ‘wp_options’ table (you can use CTRL-F to speed up the process. Click on that table and search (again) for ‘siteurl’.

Once this is done, you are required to edit the file and change the value in it. The current value is your website address and you need to change it to [websitename].wpengine.com. Press ‘Go’ at the bottom to save the file.
Next, find for ‘Home’ table and edit the file. Again, change the current value to your WP Engine temporary URL.
Step 6 – Configure DNS settings to point to WP Engine hosting
Depending on your domain registrar, you need to point the DNS to WP Engine to have all traffic redirected to your new hosting.
Basically, you need to change your current DNS settings to the new one IP address (provided by WP Engine). There are two ways to find your IP address which is provided by WP Engine support team or you can find it yourself.
To find it yourself, use this site and key in your [websitename].wpengine.com as your website URL. The IP address displayed is your WP Engine IP address.
Head over to your domain registrar and select change ‘A’ record. Change the current IP address in the system to your new WP Engine IP address.
Here are a list of tutorials provided by popular domain registrar:
Once this step is done, you need to ‘undo’ step 5 which is changing all your temporary URL to your current website URL.
Important note:
- IP propagation would take between a few hours to 48 hours
- Contact WP Engine support and request them to perform a full ‘cache clear’ to ensure that your website is running on the latest version.

Pop some beer and it’s time to celebrate! You just completed your own WP Engine migration!
By now, you have completed the whole WordPress migration process by yourself and you should give yourself a nice pat on the back! When I completed my self website migration, I was smiling because not only I am now hosted with the best managed WordPress hosting, I saved up a couple hundreds of bucks!
I hope you find this WordPress migration tutorial useful and hit the reply button if you need any help.
Of course, if you think the above is too much for you to handle, you can check on my affordable migration services too.
So, have you got yourself hosted with the best managed WordPress hosting yet? Try it now for 60 days or cancel it without charge!


Leave a Reply
You must be logged in to post a comment.